Hidden in Plain Sight: Ten Common Defects New Inspectors Miss—& How to Catch Them
New inspectors rarely lack enthusiasm; they lack a trained eye that comes from years of experience. Some of the costliest home defects aren’t loud and obvious—they’re silent sleepers that routinely slip through first-year reports.
Use this field guide to sharpen your diagnostics. We’ve compiled ten "sleeper" issues, complete with quick-spot tips and real-world anecdotes, to help you protect your clients, build your reputation, and boost confidence from day one.
1. Double-Tapped Circuit Breakers

(As seen in Image 1)
- Why it hides: In a crowded electrical panel, a double-tapped breaker—where two conductors are connected to a terminal designed for one—can easily masquerade as a factory-installed twin-lug breaker.
- Catch it fast: After confirming the panel is safe to touch, run a knuckle gently along the row of breaker lugs. If you feel two conductors moving as a single unit under one screw, zoom in for a clear photo. According to data from inspection industry leaders like Structure Tech Home Inspections, this is one of the most frequently cited electrical defects.
- Field Story: Rookie inspector “Sam” missed a double-tap on a flipped condo. Four months after closing, a loose neutral wire overheated, scorching the panel. The emergency repair cost the new owner 5 in wire nuts on inspection day.
2. Missing Kick-Out or Step-Flashing
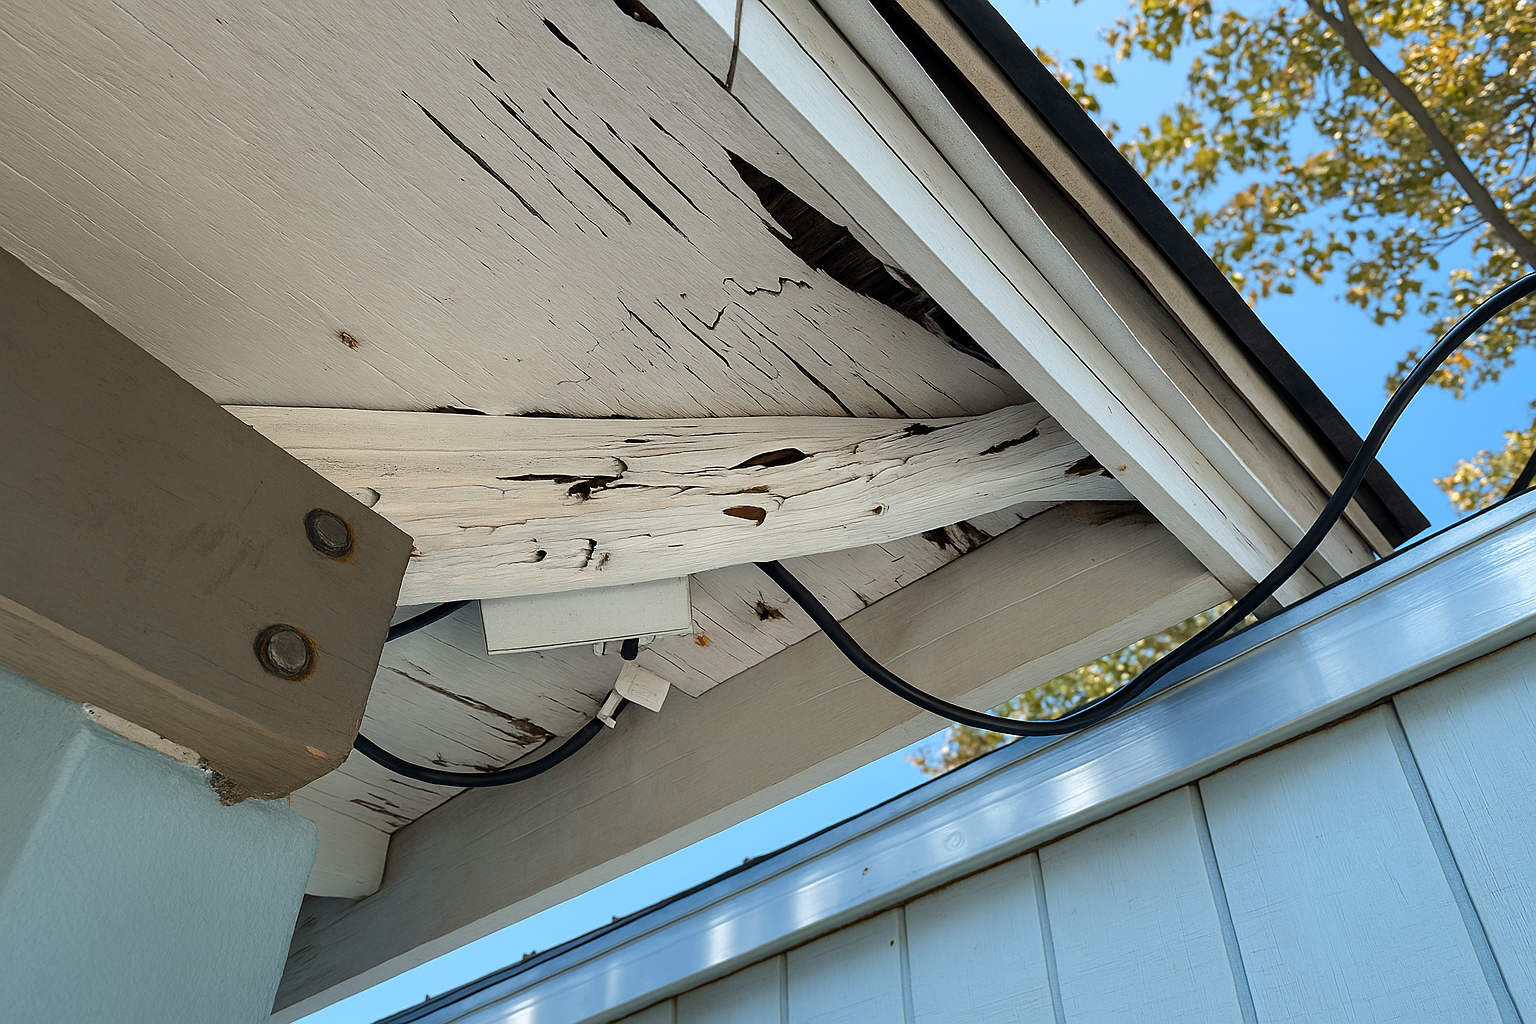
(Damage from this is visible in Image 3)
- Why it hides: Flashing is a thin strip of metal, often painted to match the trim and tucked behind siding. Without obvious water stains on a dry day, it’s virtually invisible from the ground.
- Catch it fast: At any point where a roofline meets a vertical wall, use a small mirror or your smartphone’s selfie camera to peek behind the edge of the siding. Look for a continuous piece of metal flashing. From inside the attic, scan these same junction points for any gaps of daylight. As noted by experts on the InterNACHI®️ Forum and at firms like Trinity Commercial Roofing, missing flashing is a top driver of expensive rot repairs.
- Field Story: A first-time buyer called their inspector six months after moving in, concerned about peeling paint above their patio door. The inspector returned and got a moisture meter reading of 24% behind the drywall—a direct result of missing kick-out flashing where the patio roof met the wall.
3. Negative Grading at the Foundation
- Why it hides: A gentle slope toward the house is easily disguised by thick grass, fresh mulch, or landscaping, especially on smaller urban or suburban lots.
- Catch it fast: Don’t trust your eyes; trust your tools. Lay a 24-inch level on the soil, pointing away from the foundation. Even a half-inch of fall toward the structure over that two-foot distance equals a 2% negative grade, channeling water directly to the foundation.
- Why it Matters: According to insurance claim data analyzed by axiomhomeinspection.com, poor grading is one of the most common and costly conditions leading to claims for water intrusion and foundation damage.
- Field Story: Inspector “Lena” noted a minor negative grade in her report. Two weeks after her clients moved in, a heavy summer storm flooded the crawlspace. Her note, which recommended simple regrading, saved the client an estimated $8,000 in emergency pump-out services and mold remediation.
4. Ceiling Moisture Invisible to the Eye
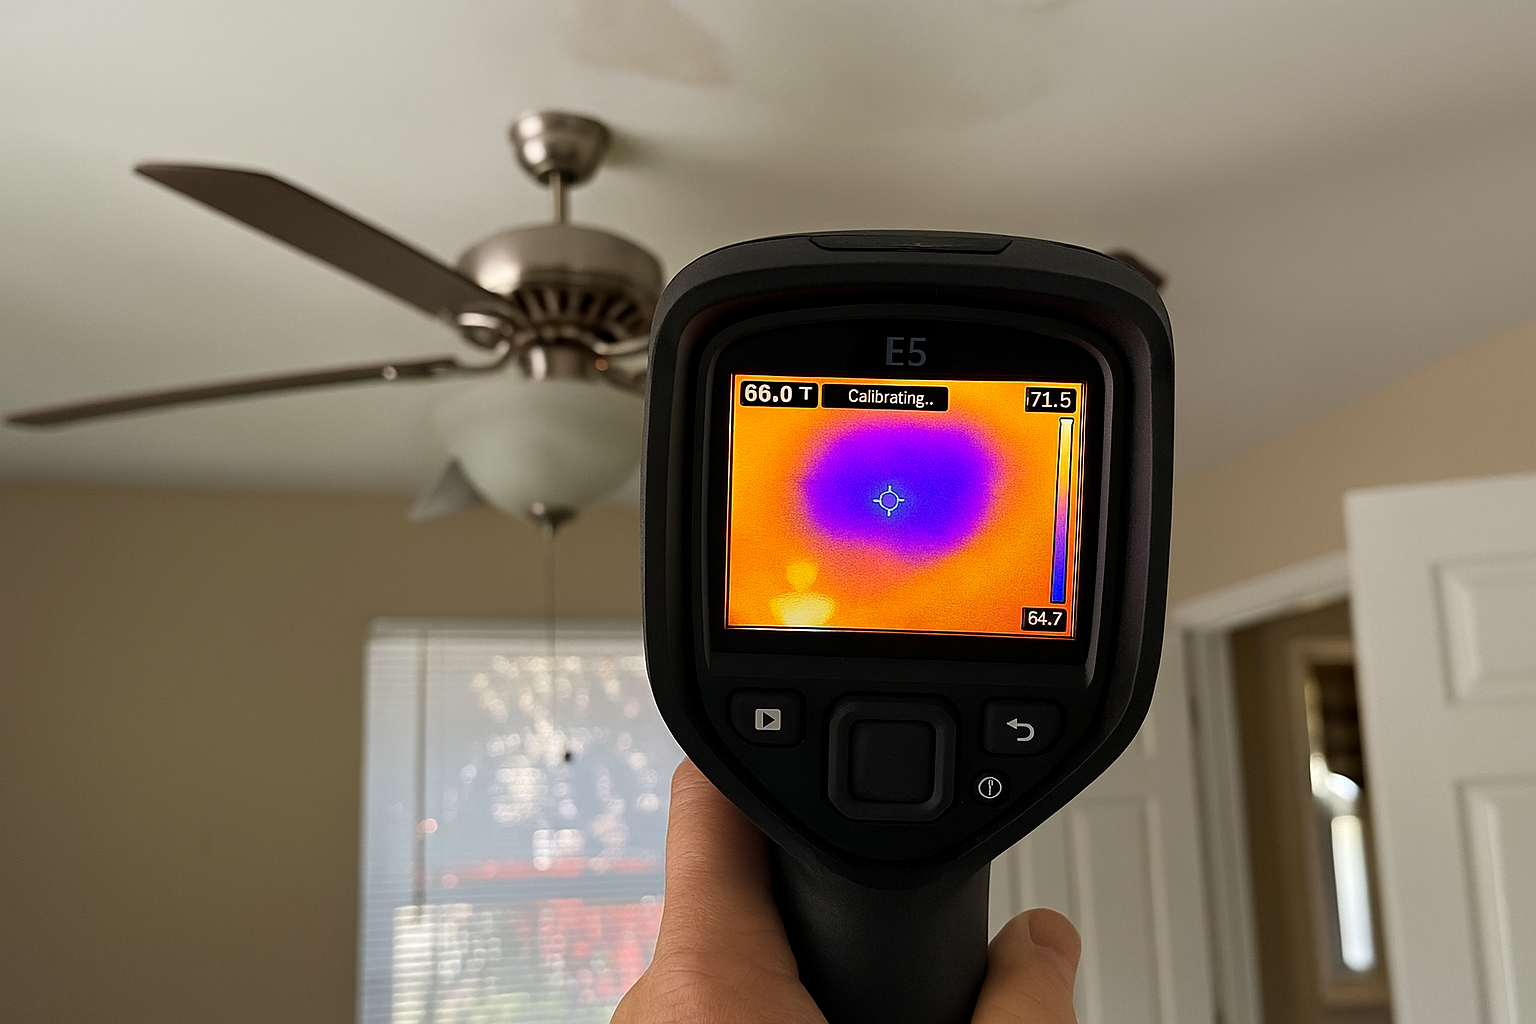
(As seen in Image 2)
- Why it hides: A small roof or plumbing leak can seep into the ceiling drywall and then dry out between rainfalls or before a showing, leaving no visible stain.
- Catch it fast: This is where technology gives you an edge. Sweep all ceilings, especially under bathrooms and in closets, with an entry-level thermal camera (many reliable models cost less than $450). Cool, violet-colored halos or blotches often indicate evaporative cooling from hidden moisture. Verify any anomalies with a pin-probe moisture meter. As noted by HomeGauge, an IR camera is exceptional at finding wet spots the naked eye misses.
- Field Story: A quick thermal scan revealed a faint violet blotch on the ceiling above a shower. The cause was a cracked plumbing vent boot on the roof—a simple $120 repair that prevented a future ceiling collapse.
5. GFCI & AFCI Protection Gaps
- Why it hides: In older homes with remodeled kitchens or baths, it's common to find new countertops and fixtures paired with vintage wiring. An outlet may look modern, but it might not have the required GFCI (Ground Fault Circuit Interrupter) or AFCI (Arc Fault Circuit Interrupter) protection.
- Catch it fast: Don't just look—test. Use a dedicated combo AFCI/GFCI tester on every required receptacle. Never assume that a GFCI outlet in the kitchen protects all the other outlets "downstream," as a hidden junction box could break the chain.
- Upsell Angle: Offer a “Safety Sweep” as a report add-on. For a small fee, you can label all unprotected circuits and include a standard quote range for an electrician to make the necessary upgrades.
6. Attic Insulation Voids
- Why it hides: Blown-in insulation settles over time, and batts are often compressed or pushed aside by cable technicians, plumbers, or HVAC contractors. In the low light of an attic, these small voids are easy to overlook.
- Catch it fast: Use a laser measurer to quickly scan depths across the attic floor. Flag any areas that are significantly below the current local code R-value (e.g., R-49 or R-60 in colder climates) with a photo and a note on the insufficient depth.
7. Bath or Dryer Exhaust Venting into the Attic
- Why it hides: The fan grille on the ceiling works, so the homeowner assumes it’s vented correctly. In the attic, the ductwork is often buried under mounds of insulation, concealing its termination point.
- Catch it fast: This requires a two-step check. From the exterior, count the exhaust caps on the roof or soffits—does the number match the number of fans and dryers? Inside the attic, look for tell-tale signs: a fine layer of lint “snow” on the trusses or dark, damp-looking "islands" in the insulation where warm, moist air is being discharged.
8. Loose Toilets at the Flange
- Why it hides: A toilet can feel sturdy, with tile grout or caulk at the base masking slight movement.
- Catch it fast: Don't be shy. Straddle the bowl and use your legs to gently rock the toilet side-to-side and front-to-back. Any wobble, however slight, indicates a failed or compressed wax ring. This is a guaranteed path to hidden water damage and subfloor rot.
9. Polybutylene or Galvanized Supply Piping
- Why it hides: Most of a home’s plumbing is concealed in walls. You may only get a few inches of visible pipe at the water heater, under sinks, or at the main water shut-off.
- Catch it fast: Know what to look for. Check the service entry point in the basement or crawlspace and look up into the ceiling of utility closets. Flag any flexible, gray plastic tubing (Polybutylene, or PB) or dull, threaded, gray metal pipes (galvanized steel). Both are known for failure and should be noted for a licensed plumber’s review.
10. Hairline Foundation or Brick Step Cracks
- Why it hides: Fresh paint is a crack’s best friend, filling in minor fissures. Foundation walls are often obscured by dense shrubbery.
- Catch it fast: Carry a small, 2-foot folding mirror to view the foundation behind bushes and air conditioning units. When you find a crack, document it with a ruler in the photo for scale. Recommend a review by a structural engineer if any cracks are offset (one side is deeper than the other) or wider than 1/8 inch.
Quick-Reference Cheat Sheet
- Panels: Scan for double-lugs after you’ve finished labeling breakers.
- Flashing: Use a mirror to check behind siding at all roof-to-wall transitions.
- Grading: Put your level on the soil, not your eyes. The ground should fall at least 6 inches within the first 10 feet away from the house.
- Leaks: Confirm what you see. A thermal anomaly + a moisture meter reading = a confirmed leak.
- Outlets: Always test, never guess, when it comes to GFCI/AFCI protection.
Turn Knowledge into Marketing
Your report is your best marketing tool. Fill it with clearly annotated photos of the defects you find. Clients share these detailed reports with agents and contractors, which builds a powerful referral pipeline.
Pair each defect image with a simple, plain-language solution and a typical cost range (e.g., “A licensed electrician should add a tandem breaker or pigtail the wires to correct this. Estimated cost: 300”). Over time, this visual storytelling—your ability to make the invisible visible—becomes your brand.
For your next inspection, bring this checklist. When you snap a photo of a defect others might have missed, you’ll watch your client say, “Wow—no one else caught that.”